Dresser Plan

I get many requests for my modifications to Patrick’s Beach Cottage Dresser as shown in this post.  I finally decided to spend some time modeling it in SketchUp so that I wouldn’t have to keep distributing my hand drawn changes. Download the 3D models here if you’re interested.

Please review the build instructions from the Ana-White.com original plans linked above for the order of construction.

Materials

QtyNominal DimensionLengthUse
22x28'Legs
11x38'Lower side and front rails
21x28'Upper side and front rails
11x103'Top (unless using the 36 1/2" top)
11x123'Top (unless using the 36 1/2" top)
31/4 plywood4'x4'Back and drawer bottoms (can use 1 full sheet and 1 smaller sheet)
13/4 plywood4'x4'Sides
21x88'Finished (outside) drawer faces
51x68'Drawers (each drawer can be made from one board)

Carcass Dimensions

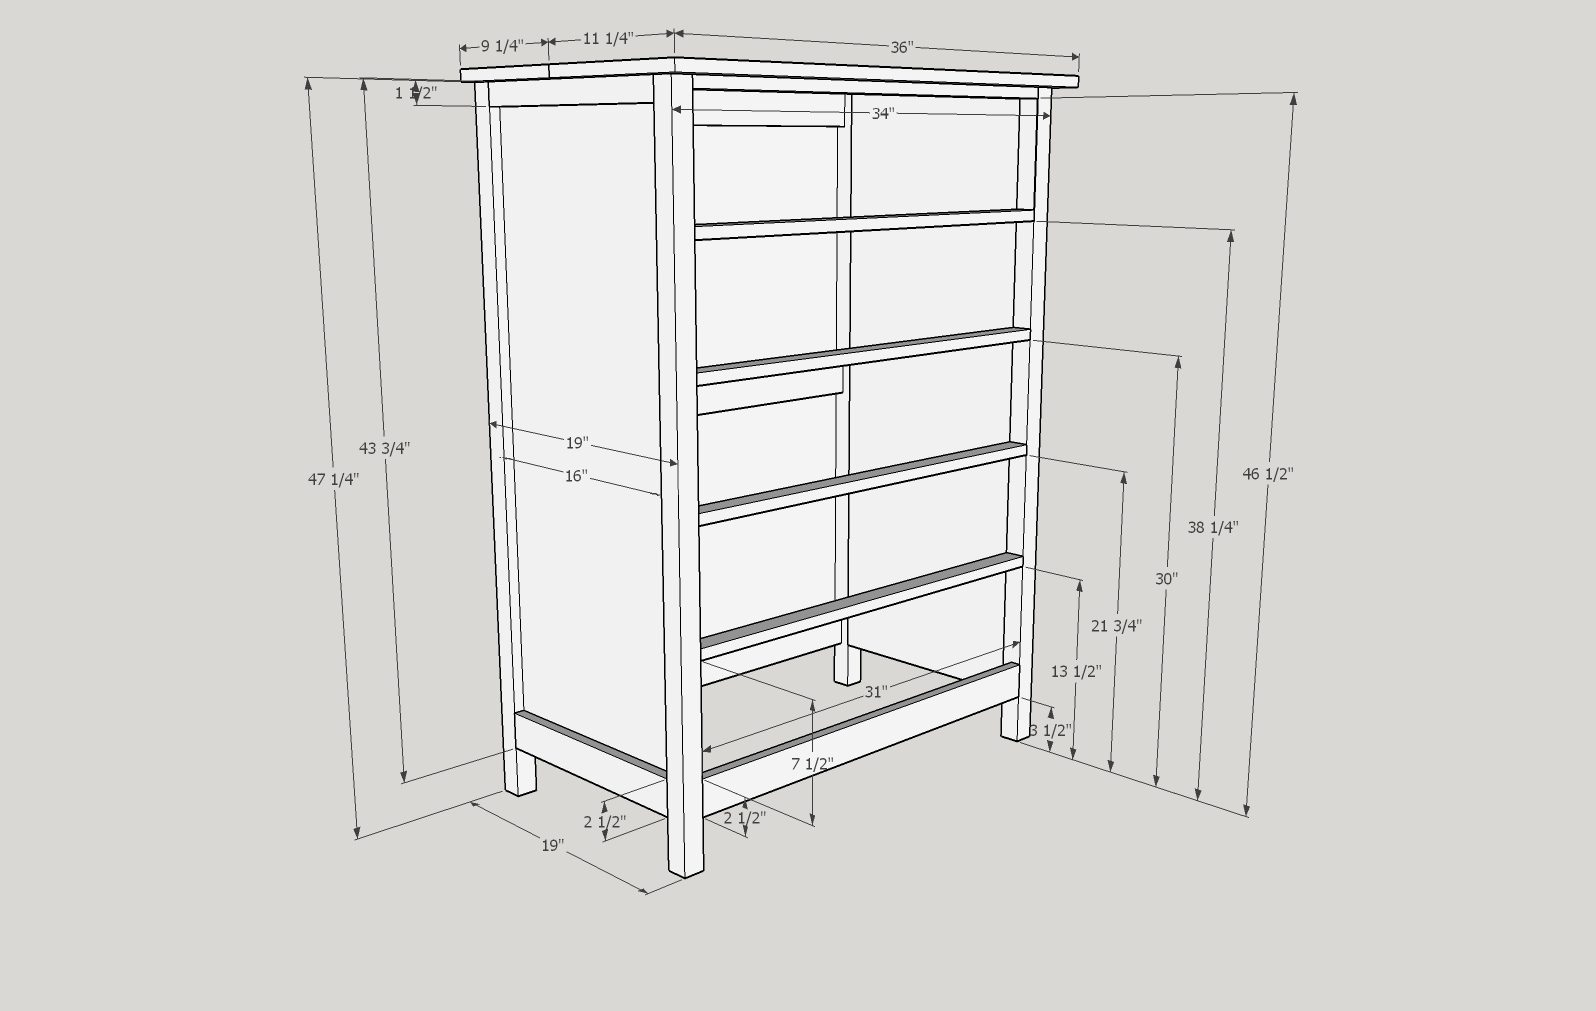
The modifications basically just stretch the cabinet depth to 19″ and add a 5th drawer. The original plans call for the the top to overhang the carcass by 1″ on the three exposed sides (left, right, front).  As shown below, the top is 1″ wider than the base and 1 1/2″ longer on the front.  You can either rip the top down by 1/2″ if you have a table saw, let the top overhang the back by 1/2, or leave the front 1 1/2″ and make the top wider to match.  In the drawing below, the overhang is uneven between the sides and front (1″ and 1 1/2″ respectively). I just use 1x? scraps for the back and top supports.  The dimensions are listed in the following image:

Carcass Cut List

QtyNominal DimensionLengthUse
42x247 1/4"Legs
23/4 plywood16" x 43 3/4"Sides
21x316"Lower side rails
21x216"Upper side rails
11x331"Lower front rail
51x231"Upper front rails
11x1036" OR 36 1/2"Top (edge glue)
11x1236" OR 36 1/2"Top (edge glue)
11/4 plywood31 1/2" x 43"Back

Drawer Dimensions

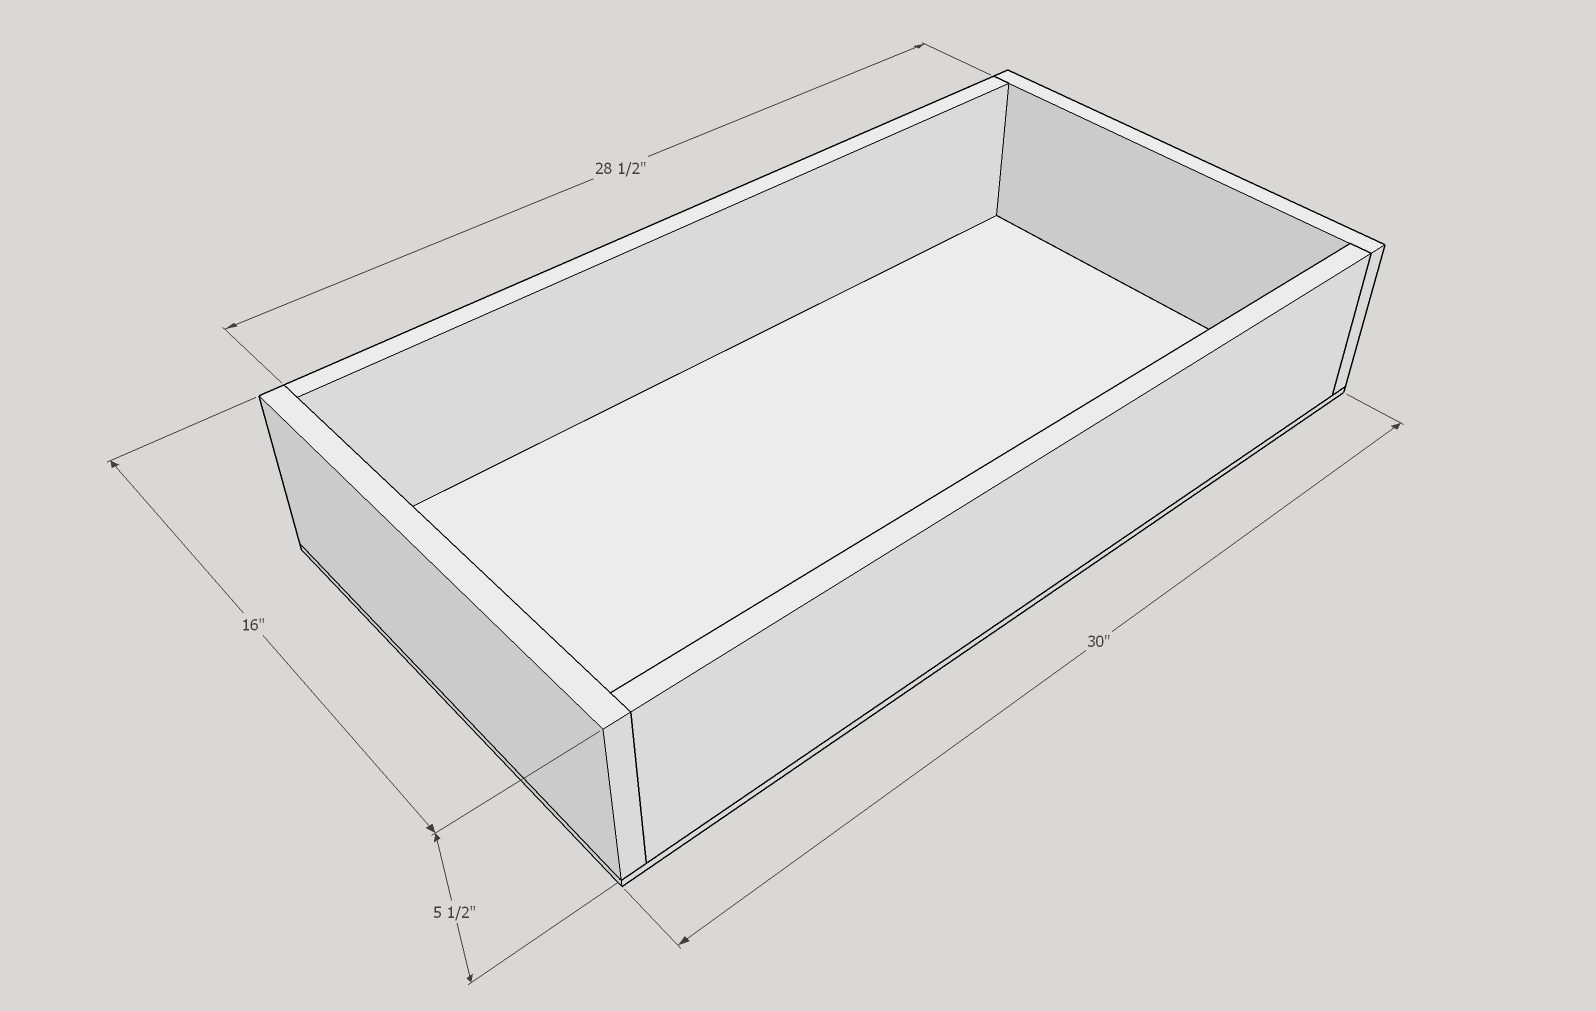
The drawers are stretched by a few inches as well.  You can actually make them even longer to fill out the back of the cabinet if you want.  I think a 17 1/2″ drawer would fit, but for this case I just used 16″ euro-style drawer slides and a 16″ drawer.  Remember that the drawer faces (1×8) should be attached to the drawer boxes after they are installed to get even spacing around the edges.  Note that the drawer faces are not shown in either drawing.

Drawer Cut List

QtyNominal DimensionLengthUse
101x616"Drawer sides
101x628 1/2"Drawer fronts & backs
51/4" plywood16" x 30"Drawer bottoms
51x830 3/4"Outside drawer faces

Jelly Cupboard Redux

Since the re-re-relaunch of grvland.com in 2012, the first post “Jelly Cupboard Project” has continually gotten more traffic than any consequent post.  And not just by a little.  Since February 2012, a full 40%+ of all traffic has gone to that single post.  Due to the continuing interest in that project, I decided to write a follow up.  Let’s get started…

I chose to make the sides of this cabinet out of plywood.  The quality of 1×12 pine at my local big box store is…well, terrible.  I thought using plywood would yield a more square carcass, and maybe it did.  The downside to the plywood I chose is twofold: it contains too many voids and the veneer is too thin causing it to delaminate easily.  Next time I will find a better quality plywood with a thicker face.

I recently got a router bit set designed to create glass doors and decided to try it out on this piece.  I wasn’t sure how long to make the rails (horizontal pieces) to fill the opening and my calculations were quite short.  As a result, the doors have a significant gap all the way around.  Not much can be done about it now (other than remake them, not going to happen).

I only assemble the bare essential pieces before painting because I use an HVLP sprayer (older model Fuji Q4).  It’s much easier to paint individual pieces than to get into every nook of a fully assembled cabinet.

The finish is a slightly modified version of what I have described previously: black walnut Danish oil, wax free shellac to seal the tannin, dark grey base coat, light greyish top coat, sand to reveal base coat, and finish with multiple coats of water-based polyurethane (satin).  Usually when I sand latex it tends to ‘ball up’ or melt, so this time I added some Calcium Carbonate (powdered chalk) to the latex top coat (1/2 cup per quart).  It is supposed to mimic the effect of chalk paint.  There is no doubt that it sanded much more evenly, but the effect wasn’t as pronounced as expected. I’ll probably add more next time to see if it will sand even more easily.

Check out the gallery below for the gory details of how I assemble and clamp the top, doors and face frame.

Play Sink and Range

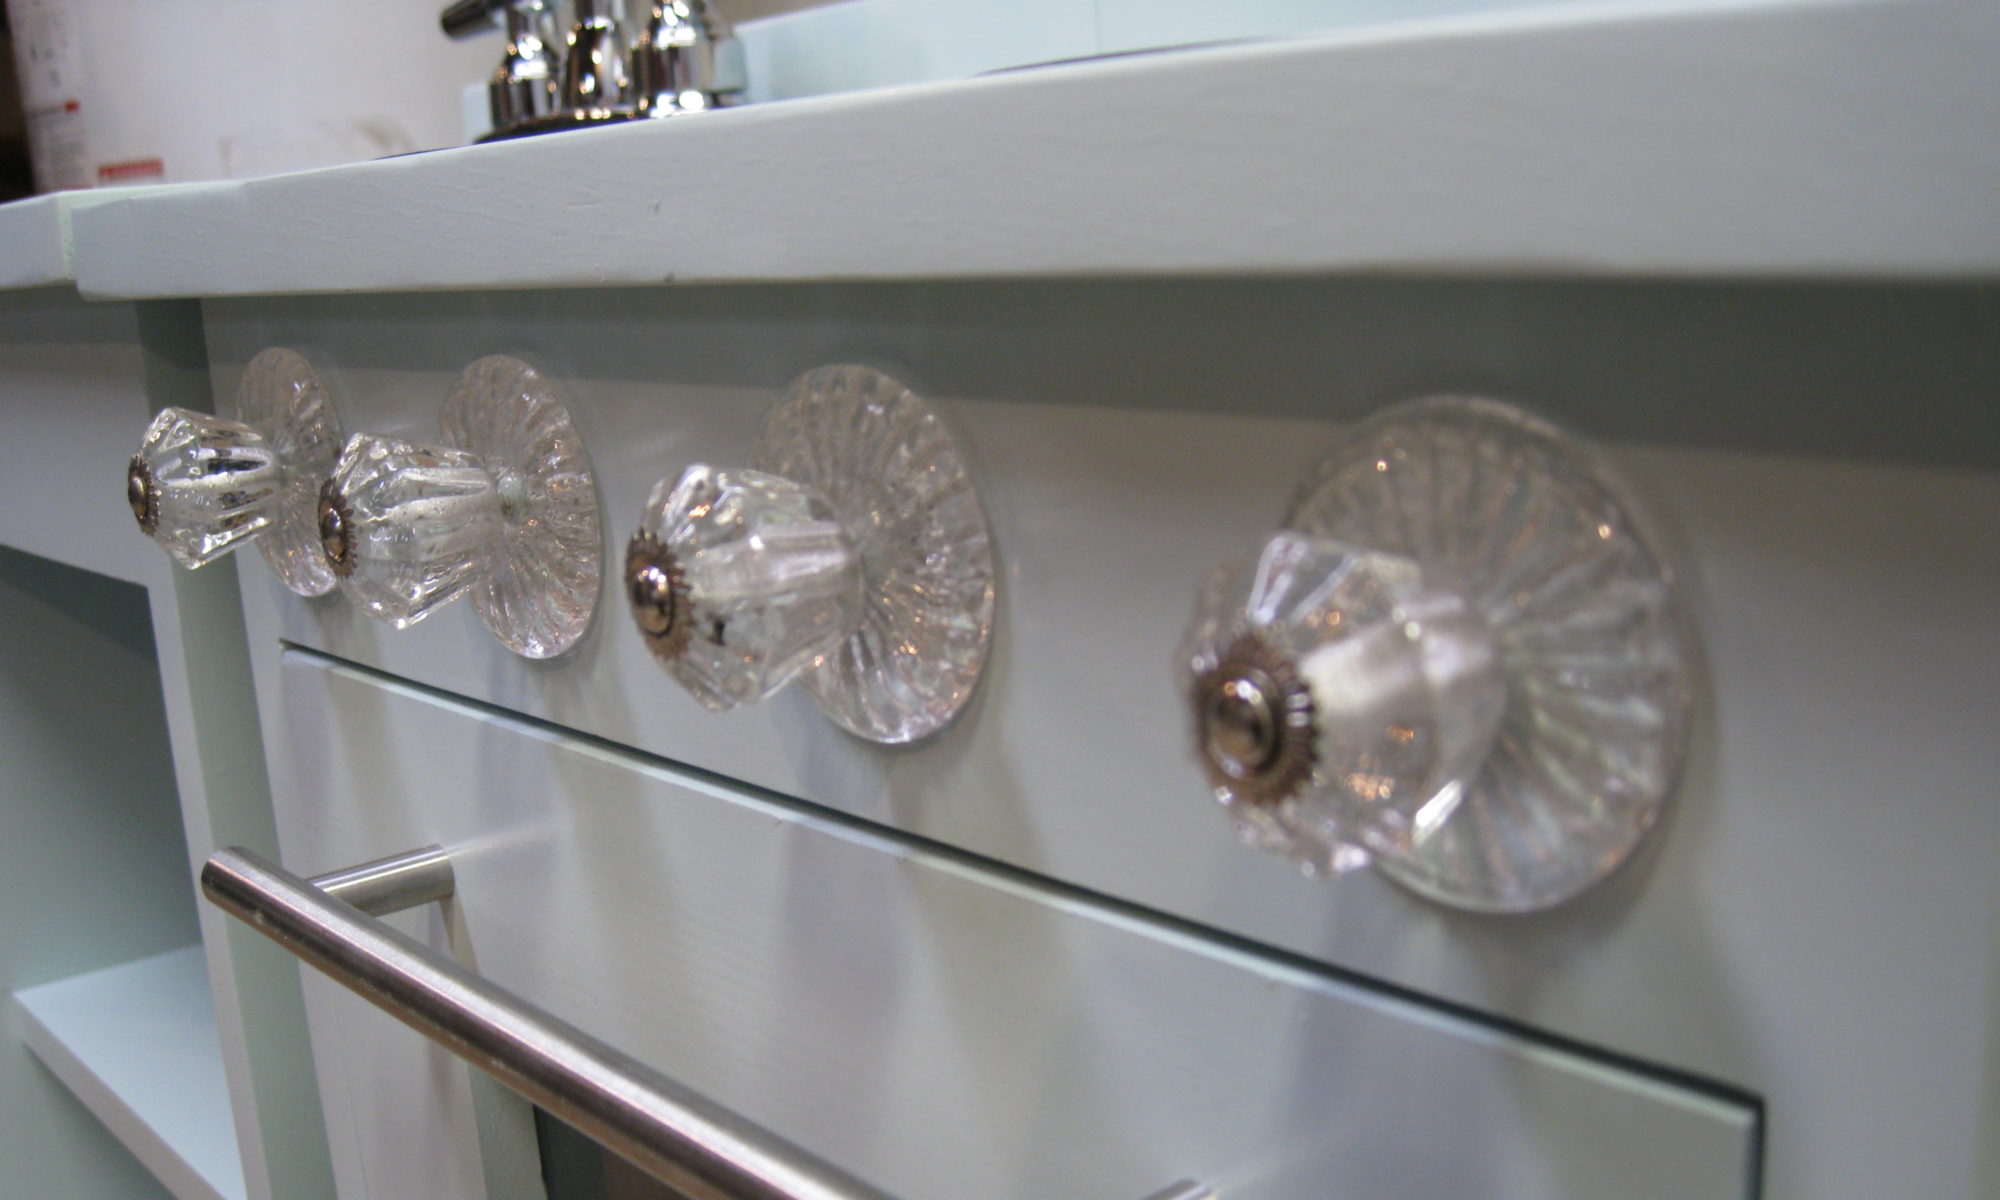
My sister mentioned one day that she was looking at a play kitchen set for her kids, but she was slightly put off by the price.  I had gotten Ana White’s book for Christmas and knew it included plans for a sink and range.  The plan in the book is an updated version of the plan found here.  I did not intend to make a set as similar as the one in the book (seen here), but that is how it turned out.  The paint I used is actually a gallon of rejected blue left over from our bathroom remodel.  I made very few modifications to the plans other than using pocket joinery instead of nails.  The faucet is a bar faucet from Menards and the sink is a dog bowl.  The oven handle is a cabinet pull also from Menards.  The burners are actually foam baseballs from Hobby Lobby spray painted black and attached with spray adhesive.  The knobs are pulls from Hobby Lobby (where all hardware is perpetually 50% off).

The best part is that our niece and nephew seem to like it!


Small side table

Well it’s been a while since I posted any projects.  I actually did build a few things that we sold at the Spoon River Drive.  I simply did not have enough time to take pictures and post those items, and they were mostly repeats of things I’ve already posted.  However I did make a new piece that didn’t sell, but ended up in my sister’s house.  My mom wanted it but gave it to my sister, so I made mom another one that is shown here.

The plans are based on this this post on ana-white.com.  I omitted the bottom shelf at the request of my sister (the other sister, the one with the booth at Spoon).  I applied the same finish I’ve been using lately which consists of: black walnut Danish oil, shellac seal coat, latex base coat, random paraffin wax, latex top coats, sand back, satin poly.  It’s still a lot of work, but I’m getting faster and the spray gun is getting easier to use.


Kitchen Island

I’ve been pondering building a kitchen island for a couple of years now.  It all started when Megan and I saw a walnut butcher block counter top that had been returned to Lowe’s and was on ‘clearance.’  We liked the look and checked online to see how much butcher block cost, and it turned out to be much less than Lowe’s clearance price (like 1/3).

islandplanFast forward 2 years, countless antique malls, auctions, flea markets and garage sales and we’re (well Megan is) out of storage and counter space (meager to begin with).  Where are we supposed to put all this Pyrex and Morton Pottery?  So, I told her I’d build her the island of her design for her birthday.  She whipped out the trusty graph paper (that’s right, she hasn’t graduated to the digital age) and iterated until she was satisfied with the look and it was something I could actually build.

Character walnut butcher blockOn to the details.  We ordered the top first, before we even had a base cabinet plan.  She knew how large she wanted the top, so we just ordered it.  It is 25″ by 60″ ‘character walnut’ from hardwood-lumber.com.  Character walnut just means they mix the heartwood (dark) and sapwood (light) to get a large variety of colors.

img_20120624_201136img_20120627_203022The bottom is a pretty standard base cabinet made of 3/4″ plywood with a face frame.  Nothing really special about it except that it has a face frame on all four sides because they’re all visible.  If I had to do it over again, I would make a couple of changes but overall I was happy with how it turned out.

Megan SandingFinished TopThe butcher block came unfinished and actually pretty rough.  The edges and one side had significant planer markings.  We sanded that off with 120 grit and finished it off with 220 grit.  After much research, we decided to use only mineral oil on the surface as it will see every day use.  After one use, it got ‘hairy’ again, so we re-sanded it with 220 and followed it up with 320 and 400.

First coat: Black Walnut Danish Oil The finish was a somewhat complicated procedure.  Our first step was to use Black Walnut Danish Oil.  It is supposed to be a penetrating oil finish.  My rationale was that it should hold more color when the top coats are sanded back than a stain.  I don’t actually know if it penetrates further or not, but it sounds good in theory.  In any case, we did not want to see super light colored pine after sanding back.

Following the Danish Oil, we used two coats of Shellac.  Shellac is supposed to be a tannin blocker.  Tannin is the compound in wood (especially the knots in pine) that will eventually discolor the top coat.  You can also use an oil-based primer or a shellac-based primer, but these are usually white and can not be tinted very dark.

The next coat was Antique Mahogany as a base coat.  We used a foam applicator instead of a brush to keep it smooth.  The top two coats are Vanilla Milkshake applied with a brush in order to get better coverage.  We sanded in between each coat and distressed it slightly after the final top coat.  Finally, we finished it with Minwax Polycrylic in Satin.  It was a lot of steps and took far too long, but the overall result is pretty good.

img_2334We chose the hardware to match what is already in our 1940’s era kitchen.  The bin pulls and door latches are from Van Dyke’s Restorers.

There are a few additional pictures in the gallery below.